|
|
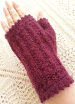 Hand Warmers |
 Mitred Corner |
 Crocheted Ribbing Seam Tutorial |
 Nappy Cake |
 Tiramisu Recipe |
 Bowl Cover |
 Blocking Howto |
 Rose Howto |
 Bowl Cover |
 Collar |
 Crochet Curved Edging |
|
Filet Mat |
|
Filet Mat |
 Estonian Lace |
 Counterpane |
 Quick Knit Poppy |
 Meggy Square |
 Slippers |
 Flat Slippers |
 Crochet Beret |
 Prime Rib Hat |
 Bicolour Hat |
 Bicolour Cosy |
 Tea Cosy |
 Tissue box cover |
|
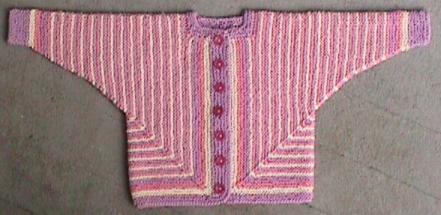
Baby Jacket |
 Seamless Bootee |
 Mitres Tutorial |
 Crochet Butterfly |
 Crochet Pelerine |
 Swan Doilies |
 Crochet Brioche Hat |
 Crochet Brioche Tea Cosy |
 Puffy Rib Cosy |
 Crochet Coffee Plunger Cosy |
 Rosy Cosy |
 Roses Afghan |
 Hexagonal Motif |
 Crochet Rose |
 dc HowTo |
 Tutorials Tidy Ends Change Colours Back Ridge Starting Chain Mystery Stitch Knitting: Buttonholes Twice Knit Increase/Decrease |
 Crochet Square Tutorial |
 Tatting Bobbin Lengths Chart |
 Crochet Square |
|
Granny Rectangle |
 Crochet Bib |
  Soccasins & Mary Janes |
 Crochet Bootee |
 Crochet Bootee |
| XXX |
Mitres - aka Dominoes or Patchwork KnittingBy: Megan Mills
IntroductionMitred (or mitered in the United States) units can be made large and constitute a whole fabric or they can be made small and used as motifs. You can pick up new motifs from ones already worked and make a fabric in patchwork style. The introduction of stripes is where the fun really begins - they can boggle the eye and the mind!The Mitred U was used as the basis for the baby jacket shown above. Two are used and they wrap around the body, one for the left half of the body and one for the right. Don't just think of these as 'flat' knitting. With a little bit of imagination who knows what you can come up with! Options for assembly of any motifs include: sewing them together, knitting them together as you go, picking up stitches from previously made motifs and working from there, binding them off together and crocheting them together. There are probably more but these are the ones I'm familiar with. You need to plan the order of the motifs depending on the assembly method you choose. Sewing or crocheting them together allows you to make all the motifs first and assemble them later. The rest of the methods require a little forethought so you have the appropriate stitches to pick up, or bind off with, or knit together with (all of these are lots of fun and give a lovely feeling of constant achievement). When it comes to the picking up method you have many options. You can do a kind of freestyle 'doodle', rather like crazy patchwork, because you can combine casting on some stitches with picking up some stitches from previously made motifs. You can even cast some on, pick some up and cast on some more. As an example take the mitred U. You can cast on one side, pick up the bottom and cast on the other side, you can pick up one side and cast on the bottom and other side, you could even pick up one side, cast on a bottom and pick up the other side.
Abbreviations Used in Instructions for MitresSSK = Slip, Slip, Knit (a left-slanting single decrease)K2T = Knit 2 together (a right slanting single decrease) DD = Slip 1, K2T, Pass the slipped stitch over (a double decrease) or you can use K 3 together you like. K = Knit Slip the first stitch of each row to create a chain edge. This makes it easy to pick up stitches later.
Mitred Equilateral Triangle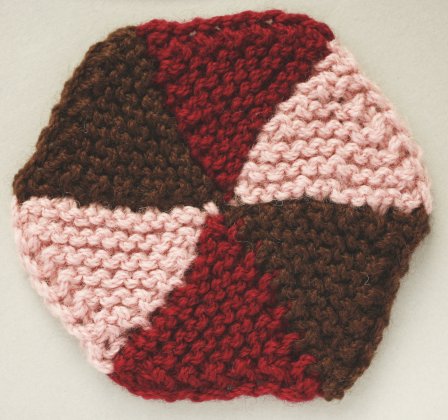 The idea here is to use up all of the stitches by the time you have made the number of ridges that go with one side of the triangle (remembering that one ridge is worth two stitches). I cast on 15 stitches for my example. Rows 1, 3, 5 etc: Do a single decrease at each end of the row. For decreases use SSK at the beginning of the row and K2T at the end. Rows 2, 4, 6 etc: K At the top of the triangle the decrease rows consist of:
K 1, DD, K 1 This leaves one stitch on the needle. If you're going to pick up along either of the two sides of the triangle next to this stitch leave it on the needle and pick up another 14 stitches along the selvedge. I slipped my first stitch to get a chain selvedge (this must not be too tight or the triangle's shape gets 'cramped') so had to pick up two stitches from each of the 7 'chains'. If I wanted things to match properly I would always pick up in one direction ('forward' of my last stitch). If I wanted to go the other way I'd pick up the stitches purlwise and make my garter stitch with all-purl rows and use the matching purl decreases. If you're not going to pick up from that point then break off the yarn and draw it through the final stitch. The picture shows 6 of these worked into a hexagon (I had to do a hexagon to be sure the equilateral triangles would lie flat - done in the right yarn they'd make nice coasters but of course you can carry on joining them together to make a fabric).
Another Mitred Equilateral Triangle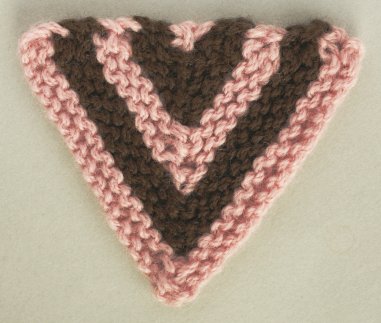 When you work just one triangle it isn't quite perfectly equilateral (after looking carefully at the math I'm fairly sure that it is as close as can be got) but it seems to settle into the shape better when more motifs are added. This was worked over 37 stitches. The same principle applies to multiples of 12 + 1 (and maybe other multiples too, but I haven't tried them out yet).
Row 1: K 1, SSK, K 14, DD, K 14, K2T, K 1 Note: These three rows contain the essence of the shaping: One row with a single decrease at each end and a DD in the centre, the next row with just a DD in the centre and the next row just knit. This rate of reduction ensures that you get the number of ridges (and chain edge stitches to pick up from) that correspond correctly to the number of stitches at the 'base' of the triangle.
Row 4: K 1, SSK, K 11, DD, K 11, K2T, K 1
Mitred Half Square - Rectangle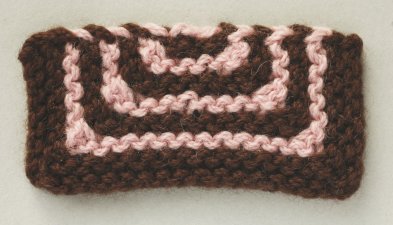 Cast on 34 Stitches. Row 1: K 7, DD, K 14, DD, K 7 Rows 2, 4, 6 etc: K Row 3: K 6, DD, K 12, DD, K 6 Row 5: K 5, DD, K 10, DD, K 5 Row 7: K 4, DD, K 8, DD, K 4 Row 9: K 3 , DD, K 6, DD, K 3 Row 11: K 2, DD, K 4, DD, K 2 Row 13: K 1, DD, K 2, DD, K 1 Row 15: DD, DD Row 17: K2T, fasten off. I found that sometimes (for who-knows-what reason) it is better not to work a plain row just before the end. Just do the Row of DD, DD and for the very next row do a K2T and fasten off.
Mitred U You can use any number of stitches you like as long as the base of the U is an even number and the sides are long enough that there will be stitches left over after the centre has been consumed by the mitres. The mitred rectangle is really just a mitred U that had the sides run out at the same time as the centre stitches were used up by the double decreases. Or, you could say that a mitred U is really just a mitred rectangle that had stitches left over after the centre was all used up (and you graft them together, but for the rectangle there's nothing left to graft together). So you can see that for a U you must have more than half the number of stitches as there are on the bottom of the U - you can make short stubby U's or long skinny ones, or anything in between. Remember that the double decreases are worked on 3 stitches so add those to the count for the sides. A base of 14 stitches needs sides of more than 10 stitches (7 + 3) - if you use 10 you'll get a rectangle. If you use less than 10 you'll run out of sides before you've used up the middle. Cast on 48.
Row 1: K 16, DD, K 10, DD, K 16 Change to contrasting scrap yarn for grafting the centre together by the following method: Leave a long tail of your scrap yarn (you'll use it in a minute). Work a second DD with the contrasting yarn and knit to the end of the row. Now get the long tail of scrap yarn and use it to knit back to the other end (leave a loose bit at the changeover at the centre or it will be hard to fold in half). Put half of the stitches on separate needles so you can line them up next to each other for grafting by folding the work in half (the U will now be flat). Use the row of contrasting yarn as a 'guide' for grafting the centre together, which you do from the centre to the outside edge with your main yarn. Graft the usual way but 'follow' how the scrap yarn goes in and out of the stitches. At the end pull the scrap yarn out. This method ensures that the second DD is worked only once (when you graft it by following the contrast thread you will put your grafting yarn through the three stitches together) and there is a proper distribution of 'ridges'. Can you see that you could even make a square with a U? For example, if you had a base of 22 you would want 11 stitches left over on the sides after the base was gobbled up. 11 (the left over we want) + 14 (the 'break even' point that makes a rectangle) + 22 (the base) + 14 + 11 (the other side) = 72 stitches. The example shown was not done on 48 stitches as above, but was done by the same method.
Mitred Square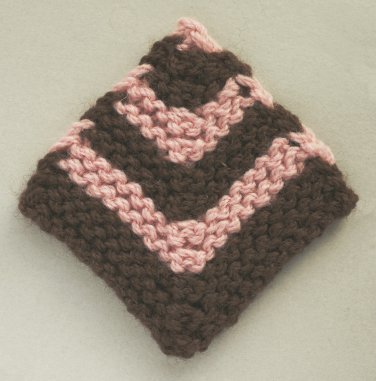 The basic idea is to start with an odd number of stitches. For my sample I cast on 25 stitches. On the first and alternate rows do a double decrease at the centre. On the next and alternate rows, K. When you get down to 3 stitches do a double decrease and fasten off.
Mitred Half Square - Triangle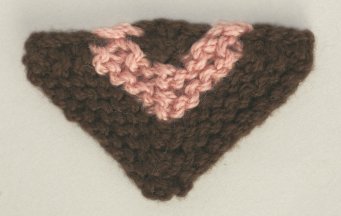 Cast on an odd number of stitches. Rows 1, 3, 5, etc: K2T, knit to centre 3 stitches, SK2P, knit to last 2 stitches, K2T. Rows 2, 4, 6, etc: K Keep repeating the last two rows until you end with:
K2T, SK2P, K2T
© Megan Mills, 3 March 2001 Last update: 6 February 2007 |
XXX |