Lace detail (top=centimeters, bottom=inches)
|
© 2008 by Megan Mills Email: megan@kiwi.gen.nz |
Photos & history @ /TissueBoxCover Web page created 14th September 2008 |
Size Fits tissue box 21cm x 11cm x 11cm or thereabouts (it is stretchy).
Experience Level: This pattern is for intermediate knitters. Adventurous beginners are encouraged to try it anyway.
I have taken care writing up this pattern but mistakes can creep in. If you find an error please let me know so that I can correct it.
Materials
Double Knitting yarn, 2 x 50g balls with approximately 93m per ball.
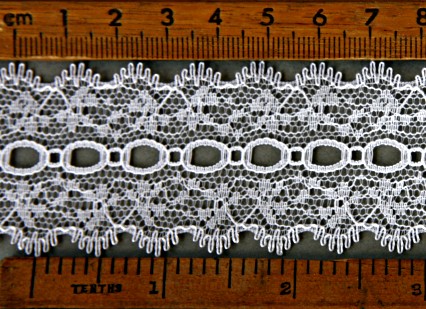
Lace detail (top=centimeters, bottom=inches)
Double-scalloped eyelet lace with holes down the centre. Yardage will depend on how many holes per metre your lace has. This lace has approximately 77 holes to the metre and is 4cm wide. I used approximately 12.5 m of lace. Get a bit extra anyway.
If your lace has a different number of holes to the metre you can work out how much yardage you need because this pattern uses 938 holes of lace. Yes, I counted! More holes per metre will give you a less frilly effect. Less holes per metre will give you a more frilly effect. Make sure you do not have too many holes per metre. You want the lace to be gathered to the knitting, not the knitting gathered to the lace!
Hat elastic, half a metre.
| Abbreviations | |
| K | knit |
| K2T | knit two together |
| S1 | slip one knitwise |
| SSK | slip, slip, knit |
| M1 | make one |
| st(s) | stitch(es) |
| m | metre |
| mm | millimetres |
| cm | centimetres |
| g | grams
|
Gauge on Garter Stitch:
20 stitches to 10cm using 3.75mm needles - or whatever needles you need to get gauge.
Notes on Lace Rows
Join in the lace on the second stitch of the row and finish on the second-to-last stitch of the row.
At the beginning of the row when you join in lace fold under the first complete hole to line up under the third hole and work through both holes together as if they were one.
At the end of the row, before you work the last stitch, cut off the lace with three complete holes to spare. Fold the lace so that the last hole is lined up under the third-to-last hole and work both holes together as if they were one when you work the last lace stitch.
To knit in lace: Hold the lace at the rear of your work behind the left needle. You will be feeding the lace in from the left - in the same direction as you feed the stitches you are knitting. *Insert your right needle through the next stitch and through the next hole in the lace, finish working the knit stitch by pulling the working yarn right through the hole in the lace and the stitch. Repeat from *. Remember to join lace in every stitch (except the first and last stitch of the row).
To join a new piece of lace part way through a row overlap each piece of lace by two complete holes and treat that part as if it were one piece of lace by working through the overlapped holes together as one.
If you want extra fullness around the corners then skip a hole in the lace for 2 to 4 stitches around each corner. Attaching lace in alternate holes will also work to gather a lace to your knitting that has holes that are too close together otherwise.
Instructions
Always slip the first stitch of each row knit-wise. This will give a nice 'pip' selvedge which allows you to have a very tidy seam that is easy to match for garter stitch.
You can use K2T instead of SSK if you wish. Pernickety knitters like me enjoy matching decreases and increases but who is going to tell on this with all that frilly lace?
Rows 1 to 12
Cast on 80 stitches and leave a tail long enough to use for seaming after you have finished.
Rows 1, 3, 5, 7, 9, 11 and 12 K
Row 2 S1, K13, M1, K2, M1, K8, M1,K2, M1, K28, M1, K2, M1, K8, M1, K2, M1, K14. (88 sts)
Row 4 S1, K14, M1, K2, M1, K10, M1,K2, M1, K 30, M1, K2, M1, K10, M1, K2, M1, K15. (96 sts)
Row 6 S1, K15, M1, K2, M1, K12, M1,K2, M1, K 32, M1, K2, M1, K12, M1, K2, M1, K16. (104 sts)
Row 8 S1, K16, M1, K2, M1, K14, M1,K2, M1, K 34, M1, K2, M1, K14, M1, K2, M1, K17. (112 sts)
Row 10 S1, K17, M1, K2, M1, K16, M1,K2, M1, K 36, M1, K2, M1, K16, M1, K2, M1, K18. (120 sts)
Rows 13 to 37
**Lace Row: K joining lace into every stitch and fasten off lace.
K 5 rows.**
Repeat between ** three more times and then do a Lace Row again and fasten off lace. You have 5 rows of lace attached.
Rows 38 to 40
S1, K17, K2T, SSK, K16, K2T, SSK, K36, K2T, SSK, K16, K2T, SSK, K18. (112 sts)
K 1 row.
S1, K16, K2T, SSK, K14, K2T, SSK, K34, K2T, SSK, K14, K2T, SSK, K17. (104 sts)
Rows 41 to 44
Lace Row: K joining lace into every stitch and fasten off lace.
S1, K15, K2T, SSK, K12, K2T, SSK, K32, K2T, SSK, K12, K2T, SSK, K16. (96 sts)
K 1 row.
S1, K14, K2T, SSK, K10, K2T, SSK, K30, K2T, SSK, K10, K2T, SSK, K15. (88 sts)
Rows 45 to 48
Lace Row: K joining lace into every stitch and fasten off lace.
S1, K13, K2T, SSK, K8, K2T, SSK, K28, K2T, SSK, K8, K2T, SSK, K14. (80 sts)
K 1 row.
S1, K12, K2T, SSK, K6, K2T, SSK, K26, K2T, SSK, K6, K2T, SSK, K13. (72 sts)
Rows 49 to 52
Lace Row: K joining lace into every stitch and fasten off lace.
S1, K11, K2T, SSK, K4, K2T, SSK, K24, K2T, SSK, K4, K2T, SSK, K12. (64 sts)
K 1 row.
S1, K10, K2T, SSK, K2, K2T, SSK, K22, K2T, SSK, K2, K2T, SSK, K11. (56 sts)
Rows 53 to 54
Lace Row: K joining lace into every stitch and fasten off lace.
S1, K9, K2T, SSK, K2T, SSK, K20, K2T, SSK, K2T, SSK, K10. (48 sts)
You should have 9 rows of lace.
Cast Off. My preferred cast-off is:
SSK, *treat st on right needle as if it were the first S of an SSK and SSK again. Experiment to see whether you like the 2nd S of the SSK to be slipped knitwise or purlwise. I do mine purlwise. Repeat from * to the end.
Leave a long tail with which to work the seam if you did not have a long tail at the start.
Join the seam by picking up the 'pip' on one selvedge and then the 'pip' on the other – being careful to match the lace rows. After every three or four stitches pull the seam closed, but not too tightly. You still want the seam to be as elastic. Tidy away the ends.
Run hat elastic through the base on the inside and tie off to fit your tissue box snugly but still loose enough that you can get your cover on to your box. Test this before pulling your knot really tight and trimming and tidying away the ends.
|
© 2008 by Megan Mills Email: megan@kiwi.gen.nz |
Photos & history @ /TissueBoxCover Web page created 14th September 2008 |