|
© 2013 by Megan Mills Email: megan@kiwi.gen.nz |
Photos & history: http://megan.cc/CrochetButterfly Web page created 02nd June 2013 |
This pattern uses British terminology. US equivalents are given in parentheses in the Abbreviations below. If no US equivalent is given the terminology is either the same for both or the stitch isn't a standard stitch at all.
A “magic ring” (sometimes called a magic circle or magic loop) is done by making a double loop of yarn around your finger with the tail going to your right and the working end going over your left finger.
Holding the loops in this position remove them from your finger and pinch them between your thumb and middle finger on your left hand.
Insert your crochet hook, front to back, into the ring, yoh and draw through a small loop, yoh and draw through the loop on the hook. This counts as your first chain. If asked to do 3ch you would do 2 more after this.
Number of stitches to work: If no number is given in the pattern, do one of the required stitch. For example “tr, ch, tr, ” means to do 1tr and 1ch and 1tr.
Size
Changes with the thread you use. In size 20 with a 0.90 mm hook mine is approximately 4 cm across and 3 cm tall (excluding the swallow tails which can be made shorter or longer as you wish).
Materials
A ball of crochet cotton (I used size 20)
A matching hook (I used size 0.90 mm)
Stiffening solution of PVA glue (a teaspoon or so) and enough water to mix with the PVA to make the consistency of runny cream. This is enough to stiffen a few butterflies, but making enough to stiffen just one butterfly is surely fairies' work!
A few tissues
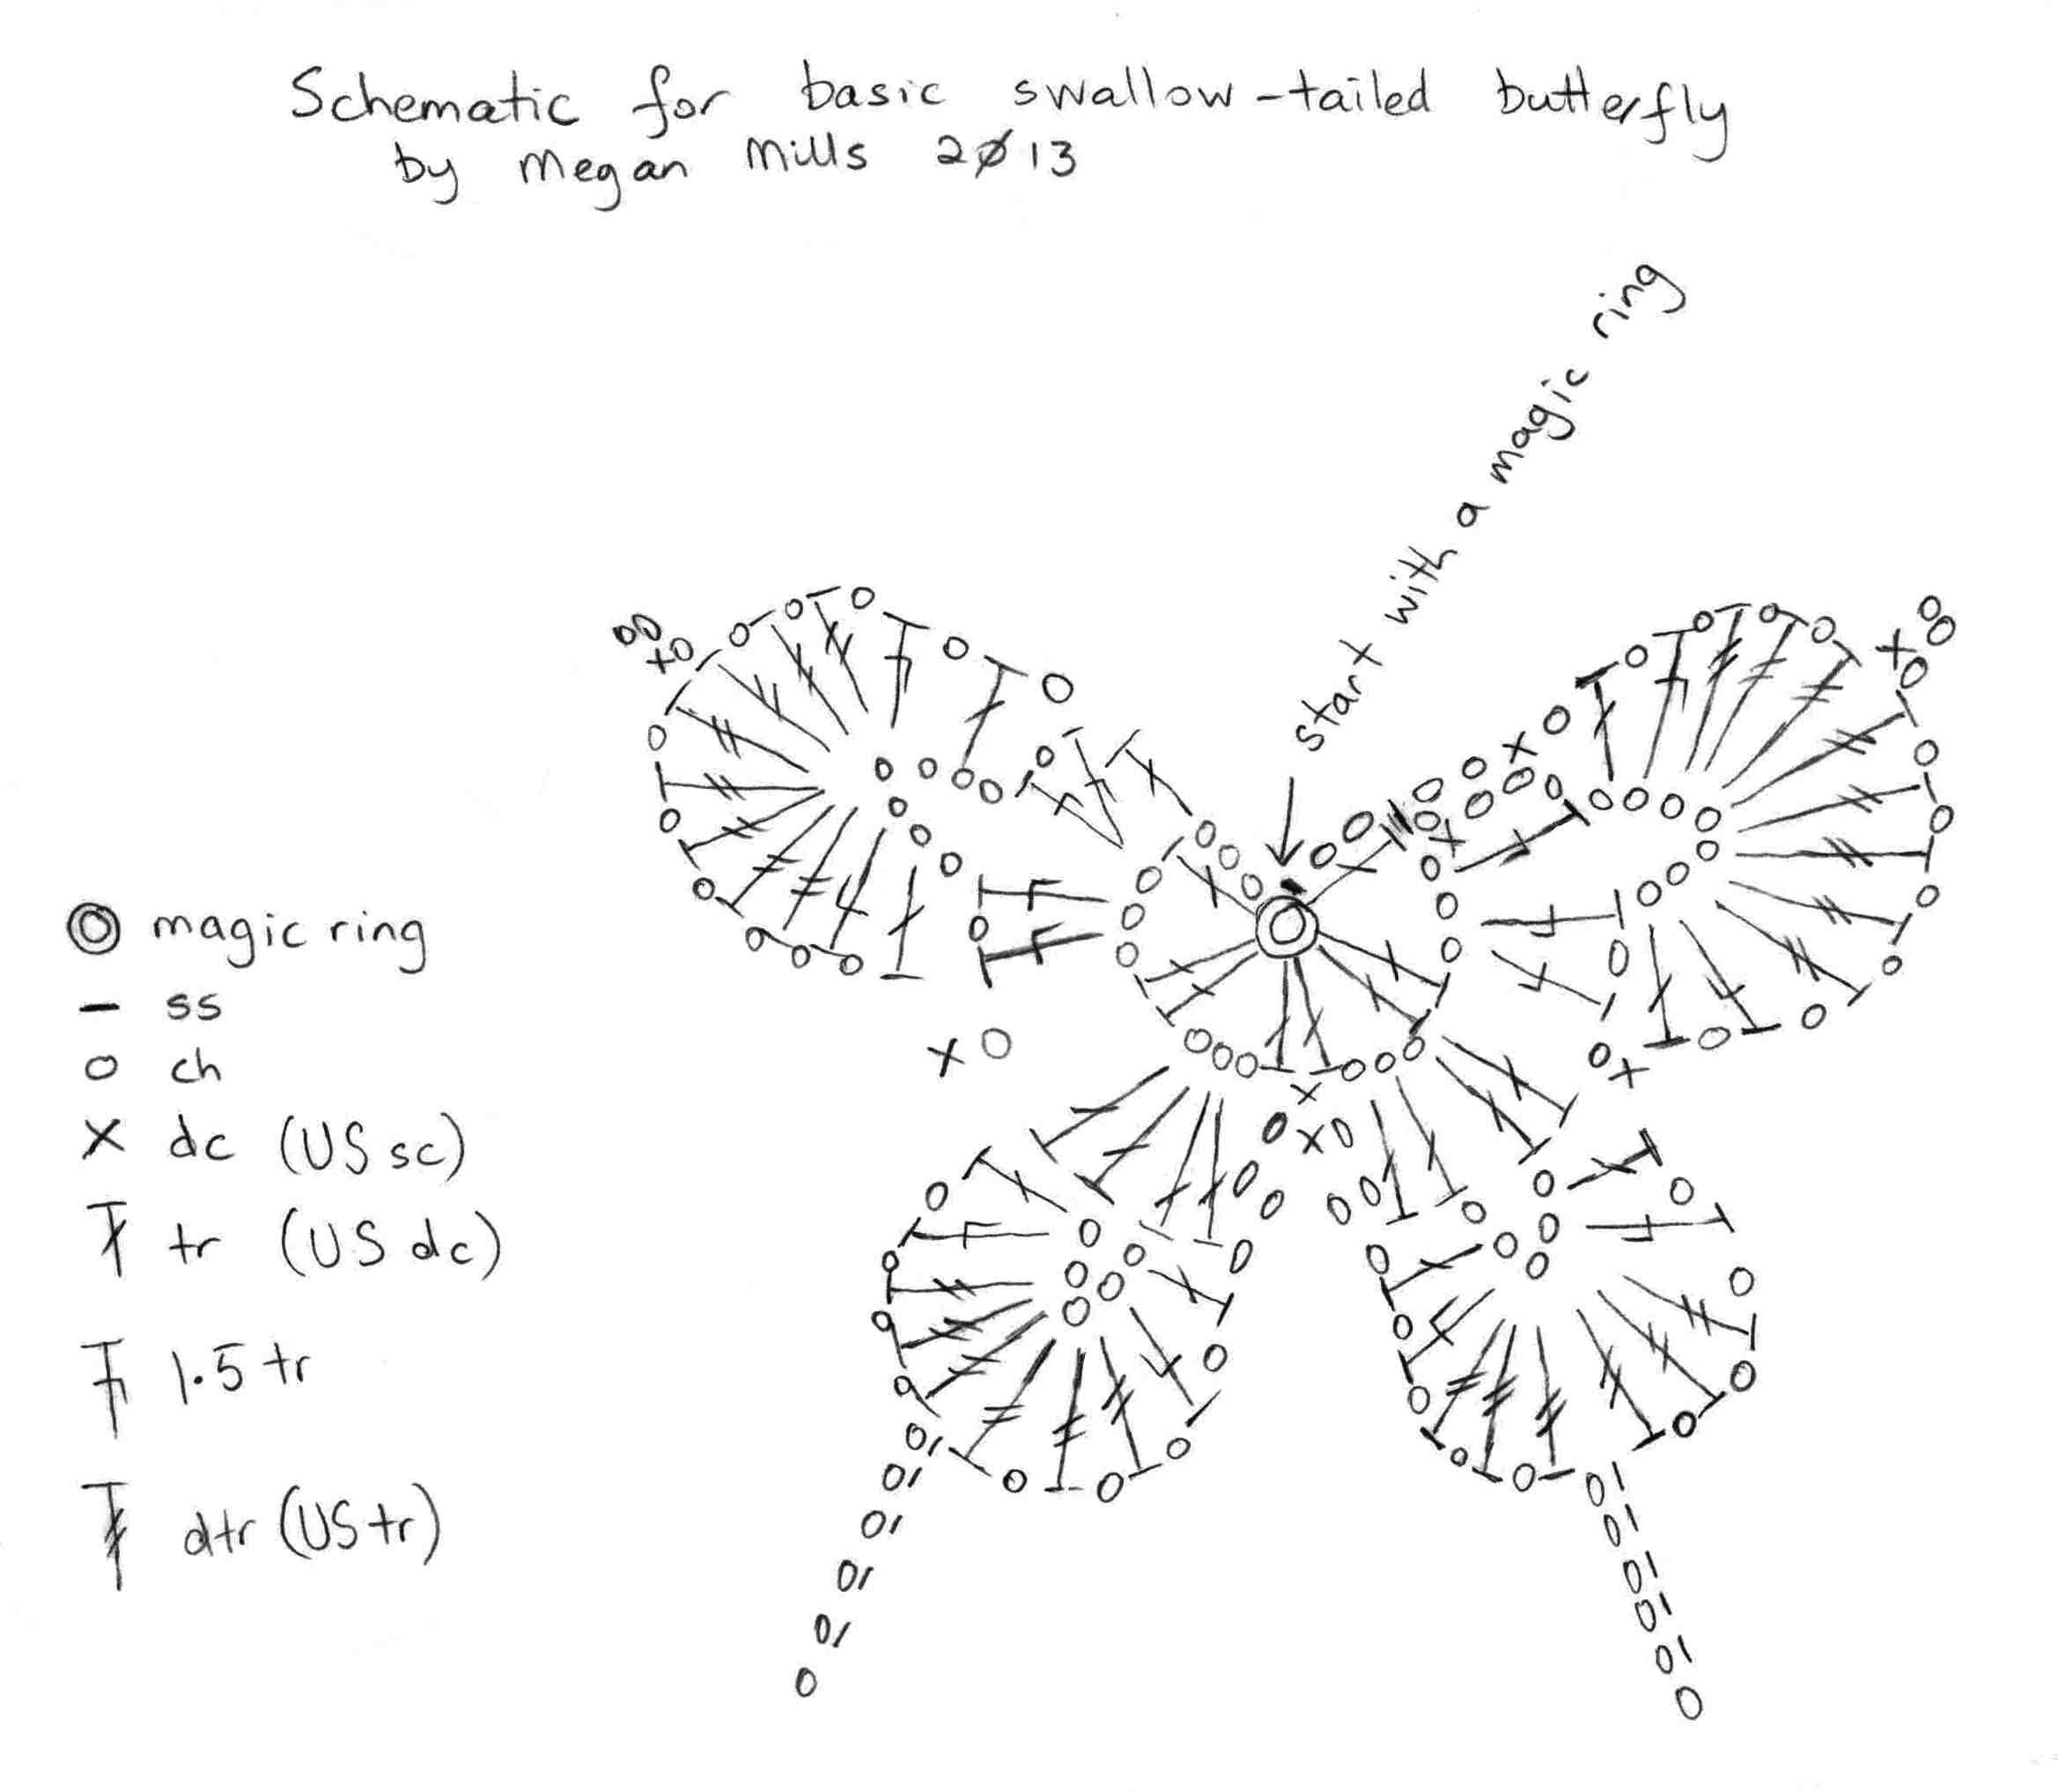
| Abbreviations | |
| ss | slip stitch |
| ch | chain |
| dc | double crochet (US sc, single crochet) |
| tr | treble (US dc, double crochet) |
| 1.5tr | yoh twice, insert hook in the indicated place and draw up a loop, yoh and draw through 2 loops, yoh and draw through last 3 loops on the hook |
| dtr | double treble (US tr, treble) |
| sp | space |
| st | stitch |
| x | times to repeat the instructions in the parentheses immediately preceding |
| p | picot of 3ch, dc into back ridge of the 3rd ch from the hook (US picot of 3ch, sc into the back ridge of the 3rd ch from the hook) |
| swt | swallow tail of 6ch, ss into the back ridge of the 2nd ch from the hook and each of the next 4 ch |
| yoh | yarn over hook |
Row 1
Into a magic ring with a 15cm tail work: 3ch, tr, 3ch, (2tr, 3ch) x 3, tr.
Tighten your magic ring (leaving a little gap to work 1 st into when instructed later), ch, turn.
Row 2
Into the first 3-ch sp work (dc, 3ch, 1.5tr, 7ch, 1.5tr, ch, 1.5tr), ch,
Into the 2nd 3-ch sp work (2tr, 5ch, 2tr),
2ch, dc between the next 2 tr, 2ch,
Into the 3rd 3-ch sp work (2tr, 5ch, 2tr), ch,
Into the 4th 3-ch sp work (1.5tr, ch, 1.5tr, 7ch, 1.5tr, ch, 1.5tr ),
Tr into the 3rd ch at the start of Row 1, ch, turn.
Row 3:
Into the next 7-ch sp: [tr, ch, 1.5tr, (ch, dtr) x 3, p, (dtr, ch) x 5, 1.5tr, ch, tr],
Miss the next 1-ch sp, dc into the following 1-ch sp,
Into the next 5-ch sp: [tr, ch, 1.5tr, (ch, dtr) x 3, swt, (dtr, ch) x 3, 1.5tr, ch, tr],
2ch, dc into next dc, 2ch,
Into the next 5-ch sp: [tr, ch, 1.5tr, (ch, dtr) x 3, swt, (dtr, ch) x 3, 1.5tr, ch, tr],
Dc into the next 1-ch sp,
Into the next 7-ch sp: [tr, ch, 1.5tr, (ch, dtr) x 5, p, (dtr, ch) x 3, 1.5tr, ch, tr],
Ch, dc into the top of the 2nd ch at the beginning of Row 2,
2ch, ss into the top of the tr at the end of Row 1,
2ch, ss into the little gap you left in the magic ring when you tightened it at the end of Row 1.
Loop on the back of the butterfly:
8 ch (or enough to reach the centre of the butterfly between the bottom wings and have a little give to it), Ss into the centre dc on Row 3 between the bottom wings.
Body:
4 ch, ss in the back ridge of the 2nd ch from the hook and each of the next 2ch,
Keeping working yarn at the back of the butterfly and the loop you just made out of the way, work slip stitches right through the butterfly from the front up the middle between the wings (I do a ss into every row to the centre of the butterfly, a ss into the central hole of the magic ring, an additional ch into the middle of the magic ring and a ss into every row up the rest of the middle of the butterfly),
Ss just to the left of the last ss of Row 3 (the one that was worked into the magic ring, between the two top wings).
Antennae:
First antenna: 11ch, cut tail and pull through the last loop on the hook.
Second antenna: Using the other tail from the magic ring, pull up a loop through the first ch of the first antenna, 10ch. Check that both antennae are the same length and adjust if necessary by adding or taking away a ch, cut tail and pull through the last loop on the hook.
Pull the final ch on each antenna firmly and trim ends to the desired length. (I use about 2 mm.)
Stiffen and shape
Thoroughly soak the butterfly in the stiffening solution, prodding and poking it so that it gets right into all the fibres. Blot the butterfly between tissues to remove the excess solution.
Pull each butterfly wing and antenna into the shape you like. Fold the the butterfly in half along the body and check that each side is the same shape and size and that both swallow tails have the same curve (put them at any angle and curve you find pleasing).
Leave the butterfly to dry flat or with the wings folded up at any angle you like. I can get the wings to stay where I want with no added assistance but if you need to then prop them up while they dry.
Instructions for the double swallow-tailed butterfly
Rows 1 and 2:
As for the basic swallow-tailed butterfly using the main colour.
Row 3:
Into the next 7-ch sp: [tr, ch, 1.5tr, (ch, dtr) x 3, p, (dtr, ch) x 5, 1.5tr, ch, tr],
Miss the next 1-ch sp, dc into the following 1-ch sp,
Into the next 5-ch sp: [tr, ch, 1.5tr, (ch, dtr) x 4, swt on 5ch instead of 6, (dtr, ch) x 2, 1.5tr, ch, tr],
2ch, dc into next dc, 2ch,
Into the next 5-ch sp: [tr, ch, 1.5tr, (ch, dtr) x 2, swt on 5ch instead of 6, (dtr, ch) x 4, 1.5tr, ch, tr],
Dc into the next 1-ch sp,
Into the next 7-ch sp: [tr, ch, 1.5tr, (ch, dtr) x 5, p, (dtr, ch) x 3, 1.5tr, ch, tr],
Ch, dc into the top of the 2nd ch at the beginning of Row 2,
2ch, ss into the top of the tr at the end of Row 1,
2ch, ss into the little gap you left in the magic ring when you tightened it at the end of Row 1.
Row 4:
Change to a contrasting colour and, starting between the top wings,
Ss into the back loop of every st and ch of Row 3 and at the same time:
When you get to a p: 2ss up right side of the p, ch to turn at the top of the p, 2ss down left side of the p.
When you are 1 st before the first swt of Row 3 do a longer swt (I use 7ch), 1ss into back loop of st immediately before first swt from Row 3, do one ch behind the first swt from Row 3 and carry on doing a ss into the back loop of every st and ch of Row 3.
When you are at the 2nd swt from Row 3 do one ch behind the 2nd swt from Row 3 and ss into the back loop of the next st on the other side of it. Now do another longer swt and carry on to match the first half of the butterfly.
Finish the Loop, Body and Antennae with the contrasting thread the same way they were done for the basic butterfly, adjusting the number of chains and slip stitches as necessary to account for the slightly longer body of this butterfly. Tidy away the main colour ends and trim.
Stiffen and shape as for the basic swallow-tailed butterfly.
|
© 2013 by Megan Mills Email: megan@kiwi.gen.nz |
Photos & history: http://megan.cc/CrochetButterfly Web page created 02nd June 2013 |